However, if you know me, you will know, that I never really stay still for long and even with the rest, I kept my creative juices flowing. My dear guy, has been such a help and gave me strict orders to behave. I don't always listen!! LOL~~ But he is right.
Today is another MMP Friday themed shopping day and for the month of January it has been the theme of Winter Romance. Click on the MMP pic to visit my shop for treasures in this theme.
So in the meantime, I have lots of new treasures to offer in my shoppe HERE and sharing today a little project you might like to try.
Last Summer I collected a few vintage dress patterns to make paper cottage roses.

Not the petal type, but rather the old fashion paper flowers we made many years ago to decorate a car for a wedding. Do you remember this? Are you familiar with these flowers? We typically created these with Kleenex tissues. Many years later, I designed a way to create the same flower with white garbage bags and they really held up to the elements, like when making a white Christmas wreath for the door.
Now fast forward to the year 2011 and a new style created in the same manner but with vintage pattern papers. The tea stain is already built in, the pattern lines, give some chic style and the paper is easy to work with like the tissue used to be.

Glitter glue was added on the top edge after the flower was created for a little sparkle.
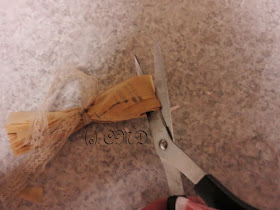
Start by opening the pattens in full, cut 12 inch or smaller squares about the size of a Kleenex tissue. Layer about 3 papers and proceed to fold the paper into a fan till finished across. Fold the fan in half and tie with jute, ribbon, or string in the middle. Cut the folded end and begin to fluff out till all the layers are open and arranged.


Shape and style adding the glitter to the edges if you like. Set aside to dry and then decorate as you choose.


For my tussie mussie creation, I added a flower to be removable at the top of the tussie for easy filling with valentine candy, special gift or a little note.
I created the valentine on the tussie front from a vintage valentine I copied to black and white. Then I added a bit of color with colored pencils and added glitter to finish. It is backed with stiff cardboard to stay strong and not bend with display.


These cottage flowers are so much fun to create and the color reflects the french chic style with distress and a shabby look. For a little color you can glitter in different color shades. Great for wrapped gift embellishments or flower arrangements too.
I'll have a few creations using these fluffy flowers in my shoppe soon and the tussie mussie is already available.
I hope you will try these flowers using vintage patterns and let me know what you think.
Have fun.
Till next time, have a wonderful winter day.
Hugs from Texas, Celestina Marie
