Thursday, November 28, 2013

THANKSGIVING PRAYERS REQUEST

Wishing all a very Happy Thanksgiving~~
****
and while we are busy cooking, visiting with family and dreaming
of decorating to follow or perhaps braving the
shopping on Black Friday.
I ask that you
please take a moment to say a special prayer for
our dear friend Diana's grandson from
 
He is very sick and in the ICU.
Doctors are struggling to determine
what is wrong.
They are running a lot of tests but have not
found the answers yet.
I pray those answers come soon
and this precious little one
is back home with his dear and loving family.
 
Our God will hear our prayers
and I know that Diana will appreciate them greatly.
 
Happy Thanksgiving and Love to all.
Celestina Marie


Monday, November 25, 2013

Creative Ornament Ideas Continued~~

A few days ago I shared with you
a tutorial for
this ornament.
 If you would like to
create it using the steps provided,
click, 
Since that post
we were hit with  winter weather
here in Texas and very cold temps.
Not snowed in, but cold temps with
sleet and drizzling rain.

And for me it's
 the perfect combo for creating
and getting into the holiday spirit.

So here are a few more ornament ideas
that are quick and easy.

Perfect for gifts,
sending as a card in a bubble envelope
or tying on a package.

Here are a few items needed.
The rest is up to your own creativity
and imagination.

Great to do with the kids
for home bound projects
 when the weather keeps them home from school.

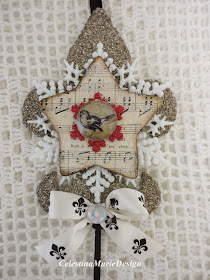
This framed angel
is another ornament card I created.
*****
Most of the supplies are gathered
from the Dollar Stores,
Michael's  and  JoAnn's  Dollar  section
along with bits and pieces left from other projects.


Backside with designer paper
to open for message.


Tinsel trimmed.


It looks so pretty on the tree.


The following is a variety of ideas
you might like to try.


Backside with designer paper for message.


Backside star to write greeting.


These are a few
created with vintage molds
or cookie cutters.


Inside the mold I added wood glittered snowflakes
with word messages, like~

Inspire dreams~


or creative journey!

 The next 3 ornaments are hand painted however and
included in my
yearly Sampler set
of ornaments.

Vintage cookie cutter~
hand painted and distressed.

Hand cut and painted wood rose birdie.


or tiny glass ornament
perfect for a small tree
or gift giving
all offered in a 3pc Sampler Set.


Every year ornaments seem to be
the best sellers on line.
I never get all that I want to offer
designed and created.

It's an on going journey
but one I truly love
and so thankful for.


So on that note,
I wish for you
a very
Happy Thanksgiving
filled with family and friends
love and blessings.

******

Graphics for the designs used in these ornaments
are courtesy of
and can be seen on the shelves

And, one more thing~~~
till Dec.9th
I am having a sale
at checkout with paypal
using coupon code
SHOP25 to receive 25 percent
off the purchase price of your items.

All apart of
The Shabby Cottage Shops
Christmas shop event going on now.

Visit till the 9th to find wonderful treasures
from many participating shops
and talented designers.

See you soon!
Happy Thanksgiving.
Hugs
Celestina Marie


Wednesday, November 20, 2013

Christmas Card Ornaments Tutorial.

Recently I wanted to design a card
that could be an ornament too.
So I came up with this design.
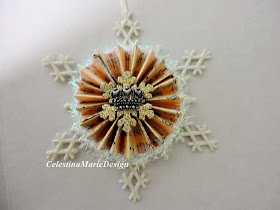
A sheet music fan background
with snowflake center,
greeting graphic added to the middle,
glittered tinsel edge
and a message on the backside.

These are the supplies you will need:

1. Sheet music graphic and snow scene graphic

2. Round wood disc to glue the graphic on 
with mod podge.

3. White glittered snowflake
found at any craft shop.

4. Winter style card stock for
backside message.

5. Snowflake stickers or whatever
you choose to accent the back message.

6. Blue distress ink with sponge applicator
to ink the edge of the wood disc.

7.Circles template for making round circles.

8.Ribbon for hanging.

9.Fancy cut scissors for back message edge
and regular scissors for cutting graphics.

10. Hot glue gun.

11. Glitter or Fairy Dust.

12.Sharpie pen for writing message.


You will need 2 copies of the sheet music in the 8x10 size.
Next, fold into a fan shape for both.
Fold each fan sheet in half after folding and glue in place.
Hot glue both halves together to form
one circle with the two fans.

Next, add the graphic greeting to the wood disc
with mod podge,
ink the edge with distress ink and glue on the white snowflake.

Glitter the snow scene using mod podge
and fairy dust or glitter.


Add the snowflake to the center of the fan circle.
Now add the tinsel ribbon to the edge
with hot glue.

For the message on the backside,
cut a round circle using a template
and cut around with fancy scissors if you choose.

Add the circle to the backside with hot glue
and embellish with glittered snowflake stickers
or any accent of your choice.
Lastly cut 12" white or any color thin ribbon
(for the hanger)
to coordinate with your ornament.
Hot glue in place between the folds at the top.

Now your ornament card is complete
and ready to mail using a padded envelope.
It will be so pretty on the Christmas tree
and a special memory for the receiver to
enjoy for years to come.

That's it,
Christmas Card Ornaments.


Thanks for stopping by.
See you next time~~

Celestina Marie

JOINING


Friday, November 15, 2013

Dress Form Ornaments

A few days ago~
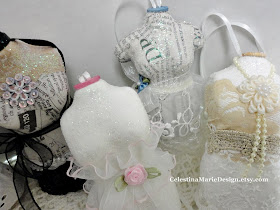
I shared these paper mache dress form ornaments
 as I began to create with them.
 
Aren't they cute?
I found them over the summer as I was checking out
from a shopping trip at Michael's.
 
They only had a few left.
Wish I could have gotten more.
Here's how they turned out.


These will be in my etsy shop, in sets of two.

 
Wait!!
Something is missing!!
 
Oh yes,
The glitter~~~~~lots of glitter!


That's better.

 
Beside these little cuties,
Here are a few more goodies going to the shop.
 
Signs to Ice Skates!
 
 
Large framed wood sign

 
Metal sign with my red velvet Christmas Roses and
I stenciled Noel and the fleur di lis.

 
This is an old roof slate
hand painted with a French graphic
and again my red roses.

 
This pair of Ice Skates was painted with Old White
Chalk Paint and a winter scene on each.
I added white ribbon laces
and boa trim around the ankle.
And, of course lots of glitter~


Thank you for stopping by.
Hope you have a great weekend.
 
See you soon.
 
Celestina Marie
p.s. all the tubs of Christmas treasures you saw in my last post,
they are empty!!
 
from the Craft Room. 

Tuesday, November 12, 2013

Let The Decorating Begin

Okay, I know we haven't even celebrated Thanksgiving yet,
but I decided to start early to enjoy the season.
 
No rushing around and missing the joy of the holidays.
 
The lights will go on Thanksgiving evening. 
I usually start decorating the day after anyway.
The difference this year, I will relax
and the work complete.
 
Well, it's really not work to me since I love to decorate.
But you all know how we spend days decorating
to bring the joy of Christmas to our homes, family and friends.
 
Over the weekend~~
 
Down from the attic
came all the tubs of Christmas.
 
There's more~

And Santa was awaken from his slumber.
Oh he lost his glasses,
I'm sure there here in one of these boxes.
He doesn't look to happy~~~
He thought he had a few more weeks to sleep.

 
Ornaments will be ready to shine and enjoy.

 
Mistletoe  to be  hung.

 
Wreaths to hang and welcome visitors.

 
Pine cones to gather.


Cards to write~
Shopping to do~
Projects to create~
Lists to make~
Baking to do~
Cleaning and washing and on and on and on~
 
Do you see why I am starting early?
I promised myself to keep it simple,
no rushing,
just enjoying~
No over the top craziness!!
 
Do I hear an Amen????
Anyone else in the spirit yet??
 
See you again soon
maybe,
I'm not rushing! LOL
 
Be Blessed
 
I'll be back to share these
dress form ornaments
next time!


Hugs,
Celestina Marie