This is what I said when I saw these little metal buckets at Home Depot in the paint department.
Two had to come back to the studio for a little redesign.
Starting with a coat of Glass and Tile Medium,
I always use this on metal and glass
to give a prime and better adhesion of paint.
Let dry over night and then paint with color of your choice.
I used Honeysuckle Bloom in matte finish from Lowe's.
It is a soft light ivory white.
Next step,
I shaded the top and bottom edges with brown sienna acrylic paint and
sanded along the top and bottom and handle for a bit of distress.
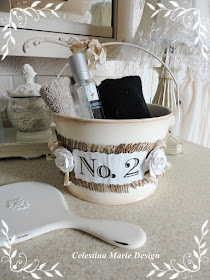
Then added a wrap around the bucket with a ribbon of burlap,
glued in place only on the center of the front side.
This is done to not see the hot glue through the burlap and look messy.
Now to the center area where the ribbon meets,
I added a number graphic from,
I printed the graphic on card stock,
cut out with decorative edge scissors and then glued in place
over the ribbon where they meet on the front side.
To the card stock graphic,
after glued in place,
I added a coat of
Triple Thick.
Triple Thick adds a gloss finish so the card stock does not tear or rip.
It adds a protective layer finish.
You can find this product at most art and craft shops in the paint section.
****
Here is the completed bucket with a few embellishments
adding vintage tea stained ribbon and flowers.
You notice the graphic looks a little wrinkled.
This is normal and when completely dry,
it will flatten out and be smooth.
****
Okay, what did I do with the second bucket?
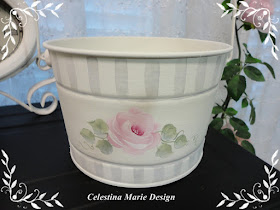
Well, painted like the first, but without the brown shading,
added a graphic from
and a few of my hand painted cottages roses.
For this bucket,
I painted stripes in a soft light grey to the top and bottom.
Then added the graphic using the chartpak marker transfer method.
Hand painted a few roses to each side of the graphic with one on the backside.
****
These are the steps for the transfer method and marker types. I used the Chartpak.
Mine was getting empty, so I did go over the graphic with a sharpie pen to darken and accent.
When all is complete and dry,
I varnished over all to seal and protect the surface using an acrylic water based sealer.
This is the Chartpak blender I used.
Other marker types.
Process to transfer.
Print graphic on a laser printer only and in reverse.
Layout in position on your surface and tape in place.
Run the marker over the design till complete and
lightly lift one corner to see how it transferred.
When you are happy with the look, take off the graphic and proceed.
*Note*
Be careful to not leave the graphic on too long as it might lift the paint when you remove it.
These little buckets will soon sit on the shelf in my etsy shoppe.
Hope they might inspire you to try these quick projects.
Put them on your bucket list to create !! LOL
Have fun and see you next time.
Smiles,
Celestina Marie


