Monday, September 29, 2014

Front Porch Autumn Welcome

The first place that makes an impression
is right at the front door to our homes.

I love to change this entry for the seasons.
Staring with my door urn, large flower pots and accents.

We are now officially into autumn.

To the door urn, I added vintage roses in fall colors, leaves
and two signs to welcome and bring in the season.

Adding large mums, a few pumpkins and garland of leaves, 
keeping it simple, yet inviting.

I think it looks like fall is here.
Even with our temps still a bit warm!


Do you decorate your front door for the seasons?

Wishing you the perfect Autumn Day!

Oh and by the way, I would have loved to join in the porch party but just hadn't decorated yet.
Maybe next year it won't be so hot this long!!


See you soon.
Celestina Marie


Friday, September 26, 2014

Fabric Pumpkin Patch

Hi Friends,
I've been working on a few new treasures for my shoppe
called  the
"Pumpkin Patch Collection"

Just arriving to fill the shelves for displaying now through Thanksgiving,
 are some pumpkins like these.
This is the larger design with tone on tone paisley fabric.


Farmhouse pumpkin in a ticking fabric and vintage tag. 
I also added stacked vintage spools for the stem


Animal print with jute stem and friends tag.


Pretty french toile fabric with red leaves and Eiffel Tower tag.


Another French style fabric with Eiffel Tower tag and check ribbon.


Sweet checked farmhouse pumpkin with fall leaf and paper rose.


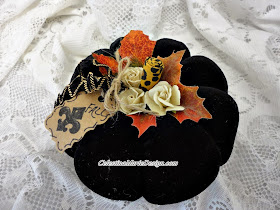
Black velvet fabric with polka dot flower, hand created jute stem and vintage tag.


Another velvet in black with animal print stem.


Sweet owl sweater pumpkin with cuff stem.


Vintage doily memories pumpkin created with creamy flannel fabric.


Sweater pumpkin with vintage doily and memories tag.


Sweet little petite pumpkin created from a sweater and cuff stem.


Another petite pumpkin with lace ribbon.


And of course a little petite for  my shabby and chic girls who always want pink and pretty.


Lastly my favorite of all called, Petite Charmer, created from a sweater that had little gemstones on it,
I incorporated that area with the stones in this design and added the silk white roses,
lace ribbon and charming tag.


I hand created all these using a design I created after not finding any patterns I liked.
I used my sewing machine and also lots of hand sewing using embroidery thread for durability when pulling the pumpkins closed. They are all filled with poly fill and some with a few dry beans.

I had such a great time and so glad to have these complete
and filling the shelves

Now I'll be sewing a few more tiny pumpkins using the rest of the two old sweaters I cut up.
So much fun and a great way to use up and recycle fabric, sweaters and trims.

Thank you for visiting my little pumpkin patch.


See you next time.

Blessings for a special Autumn Day
and thank you for your visits and comments!


Celestina Marie


Wednesday, September 24, 2014

Dollar Store Pillow Project

Hi Friends,
I'm back with another Dollar Store project creating pillows from kitchen towels.

I actually created these a couple years ago,
but thought they were worth sharing again.

$$$$$$$$$$$$$$$$

To start, I purchased a few pretty fall towels
and as you know, they are usually one dollar or less if they come in a two pack.

I merely folded the towels in half right sides together.
Next I sew one side and bottom leaving one end open or the bottom to stuff 
with poly fill and hand sew the open end closed with a blind stitch.
(a blind stitch is a sewn running stitch between the folds of the closed end)

At this point, you are ready to accent and embellish with trims, buttons,
dollies and more.

For these I used fringe for the pillow bottoms and my grandmothers
gorgeous hand crocheted lace to trim along with vintage buttons.


This one was a bit larger and a nice compliment to the smaller pillow.


So pretty to bring a pop of the season on this corner chair.

Lastly I also purchased a soft felt pillow already finished
but added my own accents, trims, buttons and crocheted lace.

There you have it,
pretty little pillow projects from the Dollar Store.
Cost, under 5 dollars for everything!

~Now that's  "less is more" decorating~

See you next time.

Be Blessed,
Celestina Marie

Monday, September 22, 2014

Treasure Chest Redesigned, Finally!

Hi Friends!

Do you ever have an item you found junkin and just 
never got around to recreating and redesigning it?

You had grand ideas, but they took a back seat to other creating?

Well this chest was that junkin find for me.
When I finally started to tackle it,
I was so excited to begin, I forgot to take a pic to share.

I had filled it with books and other stash, but hid it away
thinking I would do something with it one day.
That how it goes with things I find to keep.


Well, let me tell you what it looked like before I started.

It was a real dark blue with brass strapping over the top and sides.
Brass handles on each side and brown wood feet.

Mr. Southern DayDreams  removed the brass, sanded the lid and sides
and made it ready for me to paint.

Here's the finish.

Hand painted with chalk paint in Lace by Deco Americana
and stenciled on the lid and front these pretty designs.
The lid is painted Timeless, also chalk paint by Deco Americana.


Sanded and distressed the high points and edges.


Using the Timeless shade I stenciled the checks to all sides
and to the front I stenciled an oval frame
and to the center No.11

For the stencils I use an acrylic paint
in charcoal grey. 
It's a bit softer then using black.


Inside is also painted in Timeless chalk paint.
It was hard to get a good pic to show the tone on tone color,
but I love the shades of neutrals.


Here it is sitting by the piano in the sitting room ready to hold magazines, sheet music and more.


To the sides I added these great handles I found at Hobby Lobby for half off.
They were blue and I also painted them Timeless like the lid and checks.
They have a bit of texture on them which adds to the charm.


This treasure chest measures
15" wide, 14" tall and 13" deep.
The perfect size.

So glad to have this finished and I love the added storage.

Do you have a treasure waiting for a redesign?
I have a few more junkin finds to complete.


Thanks for stopping by.

See you soon.

Celestina Marie

Saturday, September 20, 2014

Pumpkin Pretty with Burlap

Last weekend we went out to one of my favorite design markets.
It used to be called Garden Ridge, but recently changed their name to
At Home!

This place has acres of decorative stuff!!
Rows and aisles, walls filled and room displays and accessories of all kinds.
If you can imagine an idea, it will probably be there.

Forgot my camera and could not get good pics with my phone, 
but imagine a football field with home decor departments from one
goal post to the other.

Anyway, I purchased some great finds and will share those in another post,
but today I want to share a burlap pumpkin.
Very plain burlap
 and
 the best part,
no burlap odor.
I only found one.
The lack of the aroma is probably the reason they were sold out.
Let's face it,
we love burlap but not always the scent on some fabrics.

So home this little treasure came.
And,
you guessed it, a redesign.

I gathered my supplies.
Fabric fall leaves, ribbon, paper flowers, crocheted flower,
glitter, hot glue and a graphic for a tag.


I placed the leaves right over the burlap leaves and lined with a row of glitter glue.

Added ribbon and paper flowers, crocheted in white and a few pearls.

Added a tag created from a graphic
courtesy of

Finished and ready to enjoy with other fall neutrals.

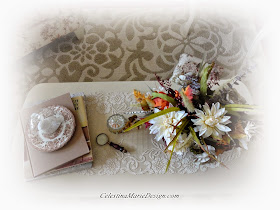
Fall Flowers~

Decorating books for cozy afternoons~

Layers of tone on tone, has stolen my heart!
and
I love brown transferware anytime of the year,
but especially in the fall.


This pumpkin was under 5 dollars
to purchase and recreate.


Can you imagine this market at Christmas?
Looking forward to viewing the many ideas when I return later in the season.

Thanks for stopping by.
Wishing you 
Southern DayDreams.

Have a Blessed Weekend!


Celestina Marie