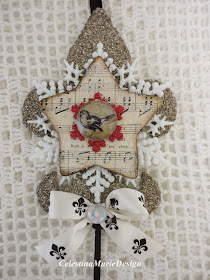
Saturday, November 29, 2014

Christmas is for the Birds!!!!

Hi Friends,
Well I had  you thinking~ what???
For the Birds??
Of course you know me better then that!! right?

I mean, I'll be decorating for Christmas in a woodland and natural sort of theme
among my treasured keepsakes and collectibles.

So the bins are down from the attic
and
the fun has begun!!

This little sweetie is enjoying the process!


See you soon to share,
MY TEXAS CHRISTMAS!

Blessings,
Celestina Marie


Wednesday, November 26, 2014

Gathering Around the Table~

Happy Thanksgiving!

We are so thankful for a day to gather with family and friends,
around a table set with love and traditions.

Remembering those no longer with us,
keeping their memory alive by honoring 
the teachings they left with us.


Enjoying a centerpiece of harvest flowers and keepsake treasures.
Thankful for plates ready to fill with a hearty dinner of turkey and trimmings.


Layers of Blue Asiatic Pheasants 
on rusty colored chargers~ 
and vintage salad bowls of leaves and fruit.
Reminding us, the joys of a fruitful life.
Happy to mix a little formal with rustic.
 Letting grapevine wreaths hold our lace napkins and a fallen leaf.
In keeping with traditions and memories,
Blue Willow must take a place at our table, 
Treasures that graced grandmother's table so long ago.
Mixing the old with the new in ways that bring the past into the present.
Our boat overflows with the flavors of life, topping the blessing of God's bounty this day.
The salt of the earth and a little pepper blesses us with the spice of life.
(The wonderful place cards were created by Diane of 1CardCreator)

Taking our place in appreciation to celebrate another wonderful day.

As the sun goes down, dinner will be served.
Thankful for blessings too many to count.
Grateful for another day in a year of abundance.

Thankful knowing each day is a gift to share with family and friends.

(The darling grey velvet pumpkin above was hand created by Julie Marie at Idyllhours from her Etsy shoppe.)

Wishing my U.S. blog friends a very 
Happy Thanksgiving and to say, I'm so thankful for your friendship.

And to all my blog friends from around the world,
I am so thankful for your friendship too.

Together you all bless my world in ways
I never imagined.

Blessings and Blue Skies Be Yours.

See you again soon.

Hugs,
Celestina Marie

Monday, November 24, 2014

Magnolia Wreath Tutorial

Living in Texas
we enjoy gorgeous Southern Magnolia trees
and especially at Christmas time.

This beauty stands in our front yard and is nearly 40 feet tall.

I love to decorate with the trimmings
and here is an example for creating a
Magnolia Leaf Wreath.

****

To begin, I lay out all the branches
and gather the size of leaves I'll need for the wreath.

I use a simple green Styrofoam round  wreath
from the Dollar Store.
This one is about 14" round.

Next, I begin to cut the leaves and stems
and hot glue them on the wreath.


Going in one direction, I hot glue the leaves
to the top, front of the wreath
 and around the sides and inside area.


Moving the leaves up and down for interest and a natural flow.

Once completely covered, it looks something like this.
The bottom leaves are placed in a cluster of three, 
where I plan to place a simple silk ribbon.

This is the backside.
No need to glue leaves to the back.
Just place enough around so you do not see the Styrofoam wreath.
The hot glue works great with
these strong thick leaves.


Once complete and the ribbon in place,
I hang it over a picture in our family/library room
using an over the door hanging hook.


While the wreath is fresh, it will last several weeks. 


To design garlands I simply wire branches
together in the size needed for
topping a hutch like the ones I share below
from years past.


In our dining room,
I add single leaf stems to evergreen for another garland.
I add tiny little lights tucked in the garland.


So there you have it.
Decorating with Magnolia branches and leaves for Christmas.
Easy, fun and free
 using hot glue and ribbon 
already in my stash.
The Styrofoam  wreath was one dollar from 
the Dollar Tree.

 ****
Thank you for stopping by.
Blessings to you and yours!
Celestina Marie


Thursday, November 20, 2014

More Christmas Ornament Creating!

Hi Everyone!
In my last post I shared this ornament card
and the steps to creating it.
Thank you for you visits and comments.
I hope you might try it and have some fun.
If you are interested in the how to, just scroll down to the next post.

Since that post
 I thought I would share a few more ideas
I've been working on and a few from last season too.

 Here are a few more quick and easy ideas.

Perfect for gifts, trimming the tree,
sending as a card in a bubble envelope
or tying on a package.

Here are the supplies  needed.
The rest is up to your own creativity
and imagination.


Most of the supplies are gathered
from the Dollar Stores,
Michael's  and  JoAnn's  Dollar  section
along with bits and pieces left from other projects.


Backside with designer paper
to open for a message.


Tinsel trimmed.


It looks so pretty on the tree.


The following is a variety of ideas
you might like to try.
Again the supplies were gathered from Dollar bins
at the craft stores.


Love the red snowflake for a pop of color.


Backside with designer paper  left blank to write a message.


Backside star to write greeting.

Since creating this ornament, 
I have decided to copy and print the fan graphic on both sides of the paper.
This allows the backside to look just as pretty as the front.

I always find vintage molds on my junkin hunts
and they too make sweet ornaments.

For these below I used wood shapes with added graphics,
glitter and trims of tinsel and ribbons.
I glued the shapes inside the molds raised a bit with another
block of wood all hot glued in place.

I also use distress ink or paint adding to the edge of the wood
and papers.


Graphic papers cut to the wood shapes with charms.
They finish these old molds
to make sweet ornaments.


Here are a few more in a white theme.


Inside the mold I added wood glittered snowflakes
with word messages, like~

Inspire dreams~


or creative journey!

  This next ornament is designed using an old cookie cutter and
created the same way.
With wood shapes raised and glued in place on
another small block of wood.
Trims, glitter, and charms add the finishing touch over chalk
paint with distress.
I drill a hole in the tops of the molds to add a ribbon for
hanging on the Christmas tree.


Every  year ornaments seem to be
the best sellers in my shoppe.
I never get all that I want to offer completed.

It's an on going journey year round
and one I truly love and  thankful for.

Hand made ornaments for giving
at Christmas are so special 
and like nothing you
will find in the stores.
I think they are as wonderful to give as to create.

Thank you for stopping by,
 and a big welcome to all new followers.
So nice to meet you and have your visits.

Stay Warm!!
and
till next time,
Wishing you,
Southern DayDreams~
Celestina Marie

Graphics for the designs used in these ornaments
are courtesy of


Monday, November 17, 2014

Creating Christmas Ornament Cards~

Last season I created ornament cards to send for
Christmas and it was so much fun.
This season I am doing a few more and
thought I would share the how to once again.

Hope you enjoy this re-post!
This ornament basically is a  sheet music fan background
with snowflake center,
greeting graphic added to the middle,
glittered tinsel edge
and a message on the backside.

These are the supplies you will need:

1. Sheet music graphic and snow scene graphic

2. Round wood disc to glue the graphic on 
with mod podge.

3. White glittered snowflake
found at any craft shop.

4. Winter style card stock for
backside message.

5. Snowflake stickers or whatever
you choose to accent the back message.

6. Blue distress ink with sponge applicator
to ink the edge of the wood disc.

7.Circles template for making round circles.

8.Ribbon for hanging.

9.Fancy cut scissors for back message edge
and regular scissors for cutting graphics.

10. Hot glue gun.

11. Glitter or Fairy Dust.

12.Sharpie pen for writing message.


You will need 2 copies of the sheet music in the 8x10 size.
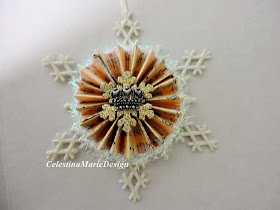
Next, fold into a fan shape for both.
Fold each fan sheet in half after folding and glue in place.
Hot glue both halves together to form
one circle with the two fans.

Next, add the graphic greeting to the wood disc
with mod podge,
ink the edge with distress ink and glue on the white snowflake.

Glitter the snow scene using mod podge
and fairy dust or glitter.


Add the snowflake to the center of the fan circle.
Now add the tinsel ribbon to the edge
with hot glue.

For the message on the backside,
cut a round circle using a template
and cut around with fancy scissors if you choose.

Add the circle to the backside with hot glue
and embellish with glittered snowflake stickers
or any accent of your choice.
Lastly cut 12" white or any color thin ribbon
(for the hanger)
to coordinate with your ornament.
Hot glue in place between the folds at the top.

Now your ornament card is complete
and ready to mail using a padded envelope.
It will be so pretty on the Christmas tree
and a special memory for the receiver to
enjoy for years to come.

That's it,
Christmas Card Ornaments.

Thanks for stopping by.
~~See you next time~~

Celestina Marie