Monday, August 29, 2016

From 80's Folksy to Shabby Chic Cabinet

Can you believe we are saying goodbye to August?
WOW
where did summer go?
As wonderful as it still is,
I am ready for fall.

With lots of projects on the drawing board,
I've been overly busy lately 
and
if truth be told,
 business gets a bit overwhelming this time of year.

However, looking back over the last few months
a lot has been accomplished 
including~
a special custom painting for a dear client who became a special friend over the years.

We met long along when I was in a brick and mortar shop stocking my treasures for the day.
Nearly 20 years later, here we are, like sisters!
Swinging my paint brushes has blessed me in more ways then I ever imagined.

At one time, furniture painting made up most of my business
and it sure kept me very busy.
Now I specialize in the smaller items for decor
and smaller furniture treasures that are easier to ship.
I eventually moved out of the brick and mortar shop after 15 years,
and love being on line selling my treasures the last 13 years.

Being a member of the
National Society of Decorative Painters for nearly 30 years
and working in  Interior Design
has given me opportunities galore!!
I just love to design, create and decorate.

Well, now you didn't stop by to read about all that,
so let's get into the title of this post,
Folksy to Shabby Chic!


It all begins back in July when
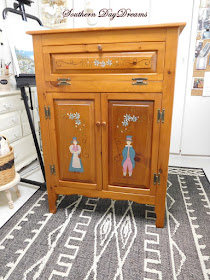
my dear friend had an Amish cabinet made about 27 years ago and 
hand painted with a folk art look and style.

It really is a jelly/pie cabinet. 
This style was popular back in the 80's and  90's.

She really wanted a new look for the cabinet and had ideas
to move it from her kitchen to a room in her home designed in 
shabby chic to display her gorgeous doll collection.
She wanted cottage roses added somehow to this treasure.

So I took on the project to help her dream come true.
Here are a few before pics.
It took 2 weeks to complete from start to finish including dry time.

Someone placed a lot of time in the old folksy paintings on the doors and pull down door.


This is what took place in my studio~~~
Lots of sanding to remove the old painting
 and lightly sand the entire surface to give a bit a tooth to grab the paint.


My hubby helped me with this part since my painters elbow and wrist
didn't like this step very much!!
That's a whole other story going on since it seems
computer work and swinging paint brushes have taken a toll on my arm.

Anyway, as for the sanding~~
do you know, the shadow of the couple would not sand off.
Oh the paint went away, but their silhouette stayed etched in the wood like a shadow!!
It's like they wanted to stay with the cabinet.
So it took layers and layers of paint to cover them over.
Somewhere in the many paint layers sleeps the folksy couple
forever to stay with this cabinet!!


Once the prime work and prep was done,
It took 4 coats of paint to cover inside and out.


You can see how pretty it looks in the lighter shade of
Honeysuckle Bloom!
This is a gorgeous flat paint perfect for furniture.
It is not chalk paint but I have used it for years
and it works beautifully and works just like chalk paint,
which I have found takes more then one coat too.
No matter what they tell you,
one coat of chalk paint doesn't cover completely.
At least that's been my experience!


Once the surface cured the design was ready  to paint
adding cottage roses to the pull down and doors.

Nothing over done, just a simple pretty delicate design.


I found some gorgeous ceramic drawer and door pulls to add.


To the pull down, I stenciled a few French pretties
adding something to view when open.


A swag of roses trail down each door.


 And, another French design is painted on the inside of each door to see when opened.
More roses here would have been too much.


Lastly, I had to included a little "Dolls" sign 
hand painted on a oval tray for her new shabby room.

It really met her idea perfectly and she loved it.

BEFORE

AFTER


This was a fun project taking a Folksy jelly/pie cabinet to a Shabby Chic style
with a little paint and cottage roses.

Thank you for stopping by to see what I've been up too.
Now it's back to lots of fall and Christmas designing in the weeks ahead~
but for this week,
I'm off to the Hill Country to give my arm a little rest.

Hope to do a little junkin while there too. 
I'll let you know what I find!!
See you when I get back.
Have a great week!

Monday, August 22, 2016

Creating a Magnolia Wreath

Living in Texas
we enjoy gorgeous Southern Magnolia trees.
A few blogging friends have asked 
how to create a magnolia wreath.


With the holidays upon us, or for anytime decorating,
I thought I would share another post on how to make a wreath
using fresh or dried leaves.

This beauty stands in our front yard and is nearly 40 feet tall.

I love to decorate with the trimmings
and here is an example for creating a
Magnolia Wreath.

You will find, it really is fairly easy to do.

****

To begin, I lay out all the branches usually cut from a needed trimming and gather the size of leaves I'll need for the wreath.

I use a simple green Styrofoam round  wreath
from the Dollar Store.
This one is about 14" round.

Next, I begin to cut the leaves and stems
and hot glue them on the wreath.


Going in one direction, I hot glue the leaves
to the top, front of the wreath
 and around the sides and inside area.
Keep in mind, these are fresh leaves.
The wreath will dry over a few weeks and become fragile.
You can still enjoy the wreath, but the vibrant green will have dulled and faded.
Some like that look too.


Moving the leaves up and down for interest and a natural flow
till all the Styrofoam ring is covered top and sides.

Once completely covered, it looks something like this.
The bottom leaves are placed in a cluster of three, 
where I planed to place a simple silk ribbon.

This is the backside.
No need to glue leaves to the back.
Just place enough around so you do not see the Styrofoam wreath.
The hot glue works great with
these strong thick leaves.
That's the beauty of using magnolia leaves, they are strong and easy to work with.


Once complete and the ribbon in place,
I hung it over a picture in our family/library room
using an over the door hanging hook.


While the wreath is fresh, it will last several weeks. 
Once it dries, it becomes more fragile,
but can still be displayed with care.


To design magnolia garlands I simply wire branches
together in the size needed for
topping a hutch like the ones I share below.
The garland below was very fresh in this photo.
The leaves lay down a bit over time giving a 
more relaxed and pleasing look.


In our dining room,
one Christmas I added  single leaf stems to evergreen for another garland style.
Little lights added to the garland make for a cozy evening glow.


Recently, I created another wreath
 and this time used
dried leaves.
I gathered the leaves and dried them over time laying flat
on a work table.

The leaves turned a faded green to brown.
To make the wreath,
I proceeded the same way as for the fresh cut wreath.

You have to be careful at this point since the leaves 
are fragile and can break.
I find them still to be easy to work with
if you just handle them with care.

After the wreath was complete,
I brushed a light coat of evergreen acrylic paint
over each leaf to make it look fresh again.

Lastly I brushed each leaf with a gloss finish varnish 
to give the wreath a bit of shine similar to  fresh leaves.

As you can see, this wreath was larger in size
and I simply added a jute ribbon.
You can see the leaves aren't as plump as fresh,
but can work.


The paint and gloss varnish brought the wreath back to looking fresher and hopefully with care, it will last throughout the season.

From the side you can see, the leaves are glued in place
to cover the Styrofoam.
For Fall I can add a pretty Autumn ribbon or bow.
and
For Christmas, Holiday ribbon will be perfect.

So that's it, easy isn't it?!?
Hope you try a wreath if you have a tree
or
maybe using faux leaves if you can find them at a craft shop.

Remember, these wreaths are made with real Magnolia leaves
and will not work with the Saucer Magnolia leaves
from that type of real tree.
Those leaves are just not sturdy enough.

Thanks for stopping by for a little crafting fun.
See you next week.

Monday, August 15, 2016

Designing Boxes

Hi Friends,
Hope you enjoyed a nice weekend.
We cooled down a few degrees with a few drops of rain over the weekend.
More rain predicted this week and we are hopeful.

***************

Recently I was going through my stash of stuff to redesign, 
 and I always find things I forget I have.

It's like going junkin all over again when I shop my store room.
Some day I'll show you that room positioned next to my studio. 
But today I'll share a few box redesigns I had stashed away.

I forgot how long ago I found this wood box.
Do you do that when you find treasures to create with?

Anyway, I've been on a kick to design with boxes lately so  this was a good re-find!!

Starting with one of my favorite chalk paints in sheepskin,
 I painted the whole wood box inside and out.


The lid just lifts off.
I think it may have had a hinge at one time, but I like the lift off style better.


Adding lots of sanded distress gives it some cottage charm.


Once dry the fun began.

I added lace and burlap ribbon all around the sides.


Lined the inside bottom and inside lid top with a pretty decorative paper
and glitter trim.


Next I added a vintage style postcard graphic to the lid on an angle.


It needed a little something, so I painted a few French roses trailing around.


Sealed all and complete for storing keepsakes, TV remote and more.

Happily this box went off to an on line friend Debbie, in our
Embracing Cottage Style giveaway for June.
So glad it has a home and can be enjoyed!

*********
Here's another box style writing desk I found at the same time.
It was painted gold in it's previous life and I nearly passed it up.

Ivory chalk paint with light pink stripes, graphics and hand painted roses and filler flowers
redesigned this one.


Adding distress all around and aged the hinges a bit more with brown chalk paint.


To the inside I added pretty decorative papers with trim to reflect my painting on the desk top.


This also lives in a new home with Jan from Jan's place.

Another below is still available in my shop.

All in shades of tone on tone whites and creams hand painted with chalk paint inside and out.
The lid is designed with crocheted flowers and painted faux leaves.
Lastly, this jewel box below found a home 
and
 several more like it have been requested.
I'm always on the search for these treasures.

It's that time of year I'm working on many projects to fill the shelves

While it's still a scorcher here in Texas, 
it's hard to think fall, but I'm trying to work on pumpkins and more.

See you next week.